Configuring an agent (Windows platforms)
This article walks you through the steps for downloading, deploying, configuring and upgrading an agent for on-prem data sources on a Windows platform.
For information on deploying to a Linux platform, see Deploying a Relay Agent in a Linux container .
Relay Agents allow you to securely connect on-prem data sources that run on your internal network to SquaredUp. For information on Relay see Relay Agent.
How to check the version of an agent currently installed
Add agents to security exclusions
Prerequisites
- The agent needs to run on a Windows machine that has access to the entry point for the on-prem data source.
- Make sure the agent is able to make outbound connections on port 443 to SquaredUp (api.squaredup.com / eu.api.squaredup.com, depending on your region), *.amazonaws.com and Microsoft Azure Relay (*.servicebus.windows.net) - this may include firewall rules and proxy server allow lists.
- If a Proxy is required, set a system environment variable named ALL_PROXY with the location of the proxy server, as modern .Net applications do not use the proxy as shown in netsh.
The proxy server may be a hostname or IP address (optionally followed by a colon and port number) or it may be a http URL (optionally including a username and password for proxy authentication). A proxy URL must be started with http, not https, and cannot include any text after the hostname, IP, or port. If the agent is running as a service, you will need to restart it, and may need to restart the server itself in some cases in order to apply the environment variable.
For information about Relay Agent versions see Release Notes - Relay Agent
Deploying multiple agents
Typically, you should be able to service all of your needs with a single agent, deployed into your internal network. However, should you have many isolated networks (either physical or virtual) that you wish to gather data from, you may need to deploy more than one agent.
Agents should never share API keys, as this will result in data requests being sent to the wrong network.
The agent will typically be deployed as its own shared service into a network communicating with multiple data sources, but if you have applications in isolated virtual networks (such as a microservices app with only open ports for front end access), you may find it convenient to add an agent into the existing service definition and manage them together as a single unit.
See the Relay Agents documentation to learn more about managing multiple agents.
How to deploy an agent
- Create a unique API key for your agent and add the agent to an agent group in SquaredUp.
You create an API key by creating an agent in SquaredUp:- Go to Settings > Relay and add an Agent.
- Give the new agent a name and a description that helps you identify where the agent is installed. For example:
Name: server1.domain.local
Description: Test server in production domain - Choose the Agent Group for this agent:
- If you already have agent groups, assign it to an existing group and click create.
- If you don't have any agent groups yet or want to assign the new agent to a new group, leave the Agent Groups field empty and click create. Then create the agent group by clicking on Add Agent Group and select the new agent in the Agents field for the new group.
- After you created the agent, the API key for this agent will be shown to you. Copy the key and store it until you inserted the key into the configuration of the agent you want to deploy on your machine.
The API key will only be displayed to you once. If you lose this API key, you need to generate a new one (by creating a new agent) and any references to the old API key in the configuration of the agent you deployed on your machine will need to be updated.
- The agent status will show as gray until the next stage of configuring the service is completed successfully.
- Deploy the agent on a machine that has access to the service the data source connects to.
- Download the latest release of the SquaredUp agent zip file, by clicking the download icon under Options next to the agent you have just added.
- The agent needs to run on a Windows machine that has access to the entry point for the on-prem data source.
- Make sure the agent is able to make outbound connections on port 443 to SquaredUp (api.squaredup.com / eu.api.squaredup.com, depending on your region), *.amazonaws.com and Microsoft Azure Relay (*.servicebus.windows.net) - this may include firewall rules and proxy server allow lists.
- If a Proxy is required, set a system environment variable named ALL_PROXY with the location of the proxy server, as modern .Net applications do not use the proxy as shown in netsh.
The proxy server may be a hostname or IP address (optionally followed by a colon and port number) or it may be a http URL (optionally including a username and password for proxy authentication). A proxy URL must be started with http, not https, and cannot include any text after the hostname, IP, or port. If the agent is running as a service, you will need to restart it, and may need to restart the server itself in some cases in order to apply the environment variable.
For information about Relay Agent versions see Release Notes - Relay Agent
- On a Windows machine, with access to the entry point your data source needs to use, extract the downloaded zip file.
- In the folder of the extracted zip file, open PowerShell as an administrator and run the following command:
./Install-SQUPAgent.ps1 -ApiKey "key" -AsService -ServiceSuffix "name" -ServiceAccount domain\username
Parameters to replace:Consider restricting access to the folder where the agent is installed to prevent anyone from updating or viewing the configuration files.
By default, the SquaredUp agent service uses the local system identity, but this can be changed to a domain service account if required, for example for the SCOM data source.
- Configure a domain service account using the installation script, for example:
./Install-SQUPAgent.ps1 -ApiKey "key" -AsService -ServiceAccount domain\username
wherekeyis the API key, anddomain\usernameis the domain service account - Alternatively, in Services > SquaredUp Cloud Agent > Properties select the account on the Log On tab.
- Use a dedicated user account for the agent's service identity. Create a special service account for this domain service account, do not use an existing user account.
- The account (typically a service account) needs to have the log on as a service permission.
- Adjust any permissions for the service and start the service.
You can start the agent service from Services > SquaredUp Cloud Agent, or using PowerShell using either:
Start-Service -Name <ServiceName>Where
<ServiceName>should be replaced with the service name shown in brackets in the upgrade script output (or Properties of the service).For example:
Start-Service -Name squpagentor
Start-Service -DisplayName <DisplayName>Where
<DisplayName>should be replaced with the service name shown before the brackets in the upgrade script output (or Properties of the service).Look at the Properties of the SquaredUp Cloud Agent service:
- On the server running the agent, open Services
- Scroll down to the SquaredUp Cloud Agent in the list
- Right-click on the SquaredUp Cloud Agent service and then Properties
- Here you can see the Service name, Display name and Path to the agent folder.
- You can also start or stop the service from here.
- Check the agent status in SquaredUp Settings > Relay
- Download the latest release of the SquaredUp agent zip file, by clicking the download icon under Options next to the agent you have just added.
How to check the version of an agent currently installed
You can find the agent version number in the Properties of the SquaredUpCloud.WinAgent.exe executable or in the log files:
- On the server running the agent, open the folder where the agent is installed.
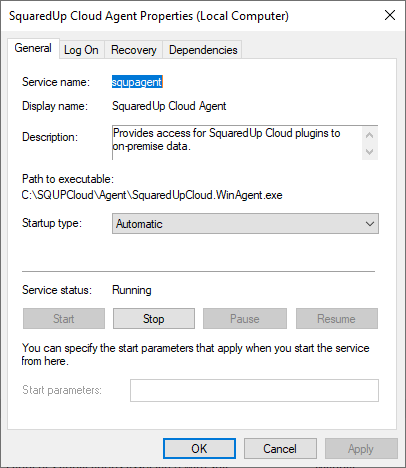
Look at the Properties of the SquaredUp Cloud Agent service:
- On the server running the agent, open Services
- Scroll down to the SquaredUp Cloud Agent in the list
- Right-click on the SquaredUp Cloud Agent service and then Properties
- Here you can see the Service name, Display name and Path to the agent folder.
- You can also start or stop the service from here.
- Right-click on the SquaredUpCloud.WinAgent.exe executable then Properties then Details.
- File Version shows the version of the agent that is installed.
- Alternatively, you can see the agent version at the top of any of the log files. Log files are located in the
agent\transient\logsfolder.
See Release Notes - Relay Agent
How to upgrade an agent
The upgrade script needs to be run on the Windows machine running the agent.
- Go to Settings > Relay and download the latest release of the SquaredUp agent zip file from the download icon under Options for your agent.
- On the Windows machine running the agent, extract the downloaded zip file at the same level as (next to) the
agentfolder.Look at the Properties of the SquaredUp Cloud Agent service:
- On the server running the agent, open Services
- Scroll down to the SquaredUp Cloud Agent in the list
- Right-click on the SquaredUp Cloud Agent service and then Properties
- Here you can see the Service name, Display name and Path to the agent folder.
- You can also start or stop the service from here.
- Open PowerShell as an administrator and run the following command:
./Install-SQUPAgent.ps1 -upgrade
The upgrade script will stop the agent service.
Make a note of theServiceNamefor the next step. The upgrade script output shows theDisplayNamefollowed by theServiceNamein brackets:VERBOSE: Performing the operation "Stop-Service" on target "SquaredUp Cloud Agent (squpagent)". - Start the agent service.
You can start the agent service from Services > SquaredUp Cloud Agent, or using PowerShell using either:
Start-Service -Name <ServiceName>Where
<ServiceName>should be replaced with the service name shown in brackets in the upgrade script output (or Properties of the service).For example:
Start-Service -Name squpagentor
Start-Service -DisplayName <DisplayName>Where
<DisplayName>should be replaced with the service name shown before the brackets in the upgrade script output (or Properties of the service).Look at the Properties of the SquaredUp Cloud Agent service:
- On the server running the agent, open Services
- Scroll down to the SquaredUp Cloud Agent in the list
- Right-click on the SquaredUp Cloud Agent service and then Properties
- Here you can see the Service name, Display name and Path to the agent folder.
- You can also start or stop the service from here.
- Check that configured data sources are available in the
agent\transient\pluginsfolder. The required connectors should be available in theagent\transient\connectorsfolder shortly after running the upgrade. - Check that dashboards using built-in data streams work as expected.
- If you have created any custom data streams (either manually or via configurable data streams) that depend upon the following data sources, you will need to update the
rowpathand columnnameproperties in each data stream to remove the“results."suffix:
For example:"name": "results.displayName"would become"name": "displayName"
and"rowPath": ["results"]would become"rowPath": []- SCOM data source
- Custom PowerShell data source
- VMware data source
- Solarwinds data source
- Once you have checked everything is working, remove the
backupfolder.The
backupfolder is created in case you need to roll-back: You can stop the service, delete or rename the existingagentfolder, rename the backup folder toagent, and then restart the service.
How to remove an agent
- On the server running the agent, locate the SquaredUp agent service you wish to remove.
Services > SquaredUp Cloud Agent. - Right-click Properties and make a note of the Service name and the Path to executable.
If the agent was configured without a suffix (i.e. a single instance of the agent) then the service name will be squpagent. If a suffix was specified when the agent was configured, a version of the suffix (with spaces and other special characters swapped for "-") will be appended to the name.
- Open PowerShell as an administrator and run the following command:
sc.exe delete squpagent
Wheresqupagentis replaced with the service name if it is not simplysqupagent.This will remove the service from Windows.Look at the Properties of the SquaredUp Cloud Agent service:
- On the server running the agent, open Services
- Scroll down to the SquaredUp Cloud Agent in the list
- Right-click on the SquaredUp Cloud Agent service and then Properties
- Here you can see the Service name, Display name and Path to the agent folder.
- You can also start or stop the service from here.
- Finally, delete the agent folder, as referenced in the Path to executable above.
Add agents to security exclusions
To ensure that the Relay agent functions correctly, it is strongly recommended that you add the process to the list of exclusions for each of your virus, AppLocker and heuristic scanners.
For configuring Windows security exclusions, see Add an exclusion to Windows Security and AppLocker.
For any other security applications refer to the corresponding documentation.
Troubleshooting an agent
An agent's status is shown in SquaredUp Settings > Relay as a green tick, amber exclamation mark, red cross or gray question mark. Hovering over the status will show information about the last connection.
If the agent status is not green:
- Check that the agent service is running (in Services on the server running the agent).
- Check that the API key is correct. In SquaredUp you can see the last 4 digits of the API key in Settings > Relay and compare this with what's in the
appsettings.jsonfile in the agent folder/agent/transient/logs. If necessary, you can edit the agent and click Regenerate API Key to get a new key, then copy that into theappsettings.jsonfile.Look at the Properties of the SquaredUp Cloud Agent service:
- On the server running the agent, open Services
- Scroll down to the SquaredUp Cloud Agent in the list
- Right-click on the SquaredUp Cloud Agent service and then Properties
- Here you can see the Service name, Display name and Path to the agent folder.
- You can also start or stop the service from here.
- Check the agent logs for any connectivity errors. Support may ask you to change the
LogLevelfromInformationtoDebugin theappsettings.jsonfile. - Check SquaredUp for any reported outages: https://squaredup.statuspage.io/